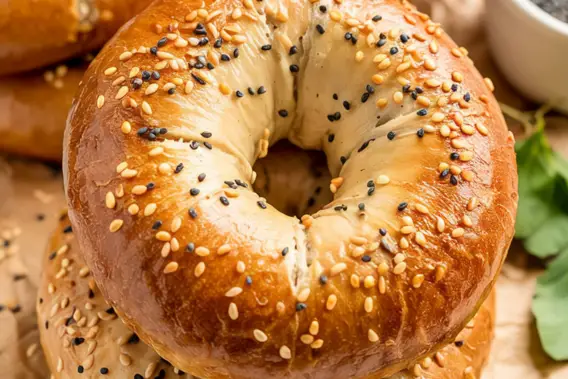
I’ve always loved the idea of homemade bagels, but the thought of kneading dough and boiling them before baking seemed like too much work. That’s why I was thrilled when I discovered this ridiculously easy 3-ingredient Greek yogurt bagel recipe—no yeast, no boiling, and best of all, no hassle! These bagels come out perfectly chewy on the inside with a slightly crisp exterior, just like the classic ones, but with a fraction of the effort.
What makes this recipe even better is that it’s made in the air fryer, meaning they cook in just minutes. Plus, they’re high in protein thanks to the Greek yogurt, making them a great breakfast or snack option. Whether you’re a busy parent, a meal-prepper, or just someone who loves fresh bagels without the fuss, this recipe is a game-changer.
What You Need To Make This Recipe
Self-rising flour: This flour already contains baking powder and salt, which helps the bagels rise and gives them the perfect texture. If you don’t have self-rising flour, you can make your own by mixing all-purpose flour with baking powder and a pinch of salt.
Greek yogurt: The key ingredient that replaces traditional dough ingredients like yeast and eggs. Greek yogurt adds protein and moisture, creating a soft yet chewy texture. For best results, use full-fat Greek yogurt—it makes the bagels richer and more flavorful.
Everything bagel seasoning: This blend of sesame seeds, poppy seeds, garlic, onion, and salt gives the bagels that classic savory flavor. You can also customize the toppings with sesame seeds alone, cinnamon sugar, or even grated cheese for a different twist.
Ingredients List
- 1 cup self-rising flour (plus extra for dusting)
- 1 cup full-fat Greek yogurt
- 1 tbsp everything bagel seasoning
How to Make Air Fryer 3-Ingredient Greek Yogurt Bagels
Step 1: Mix the Dough
In a large bowl, combine the self-rising flour and Greek yogurt. Stir until a shaggy dough forms. If the mixture feels too sticky, add a little more flour, but be careful not to overmix—this keeps the bagels tender.
Step 2: Shape the Bagels
Turn the dough onto a lightly floured surface and divide it into 4 equal parts. Roll each piece into a ball, then poke a hole in the center with your finger and gently stretch it to form a bagel shape.
Step 3: Add the Seasoning
Sprinkle the everything bagel seasoning over the top of each bagel, pressing lightly so it sticks. You can also brush the bagels with a little water or egg wash to help the seasoning adhere better.
Step 4: Air Fry the Bagels
Preheat the air fryer to 350°F (175°C). Place the bagels in the basket in a single layer, making sure they don’t touch. Air fry for 10-12 minutes, flipping halfway, until golden brown and cooked through.
Step 5: Cool and Serve
Let the bagels cool for a few minutes before slicing. They’re best enjoyed fresh but can be stored in an airtight container for up to 2 days.
Tips for Making This Recipe
- Use full-fat Greek yogurt for the best texture and flavor. Low-fat versions may make the dough too sticky.
- Don’t overmix the dough—this can make the bagels dense instead of light and chewy.
- Customize the toppings—try cinnamon sugar for a sweet version or grated Parmesan for a cheesy twist.
- Check for doneness—if the bagels are browning too quickly, lower the air fryer temperature slightly.
- Reheat leftovers in the air fryer for 2-3 minutes to restore crispness.
FAQs
Can I use regular yogurt instead of Greek yogurt?
No, Greek yogurt is thicker and has less moisture, which is essential for the right dough consistency.
What if I don’t have self-rising flour?
You can make your own by mixing 1 cup all-purpose flour with 1½ tsp baking powder and ¼ tsp salt.
Can I bake these in the oven instead?
Yes! Bake at 375°F (190°C) for 20-25 minutes on a parchment-lined baking sheet.
How do I store these bagels?
Keep them in an airtight container at room temperature for up to 2 days or freeze for longer storage.
Why are my bagels too dense?
You may have overmixed the dough or used too much flour. Handle the dough gently for the best texture.
Enjoy your homemade bagels—they’re so easy, you’ll want to make them every week!